Remote forms of testing are problematic and challenging for teachers. Students can easily share test assignments and answers, collaborate or share what your video exam looks like. If the teacher really wants to know whether the student has met the course requirements, acquired the given experiences and skills, they must engage wit, improvise or even resign to new ways they haven’t tried so far.
Let's take a look at your colleagues' experiences, plans and find out what you need to learn in order to perform remote testing.
Děkujeme panu proděkanovi doc. JUDr. Davidovi Sehnálkovi, Ph. D. za poskytnutí podkladových textů z Právnické fakulty, které mohou být skvělou inspirací pro další vyučující na dalších fakultách.
Požadavky na studenta
Počítač, tablet nebo mobilní telefon s rychlým připojením na internet, kamerou a mikrofonem
Nainstalovaná aplikace MS Teams (webová aplikace je možná, ale v některých ohledech nedostačující)
Přihlášení do MS Teams pod univerzitní identitou
Měl by si nanečisto vyzkoušet (třeba s kolegou), zda mu vše funguje
Požadavky na učitele
Počítač, tablet nebo mobilní telefon s rychlým připojením na internet, kamerou a mikrofonem
Nainstalovaná aplikace MS Teams (webová aplikace je možná, ale v některých ohledech nedostačující)
Postup učitele před zkouškou
V Informačním systému vypište termín, ke kterému se studenti přihlašují, v poznámce k termínu specifikujte, že zkoušení proběhne přes MS Teams a jak dlouho bude zkoušení jednoho studenta v průměru trvat. Pokud jste s aplikací pro zkušební termíny nikdy nepracovali, kontaktujte fakultního e-technika.
Informujte studenta, že v době schůzky má být online na MS Teams a že jej budete volat videohovorem.
Postup učitele při zkoušce
U daného termínu zkoušky v Informačním systému si najděte učo studenta a to zadejte do volání v MS Teams. Aplikace zná všechny studenty a bude Vám je nabízet.
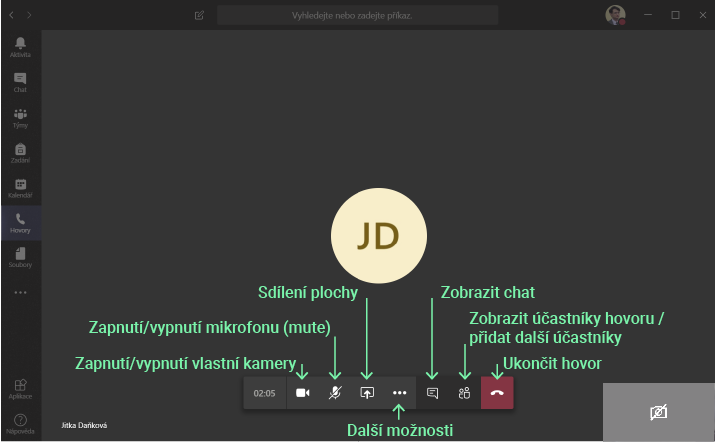
Základní rozhraní videohovoru v MS Teams
Identifikujte studenta, pravděpodobně postačí srovnání fotografie z Informačního systému, při nejasnostech, či u zahraničních studentů můžete požadovat ukázat na kameru doklad (např. ISIC).
Lze se setkat s doporučeními požádat studenta, aby ukázal kamerou okolí počítače a místnost v níž se nachází, aby se odhalily případné nepovolené pomůcky, či osoby, které by mohly napovídat. Doporučujeme postupovat obezřetně, neboť se může jednat o zásah do soukromí studenta. Během samotné zkoušky pravděpodobně poznáte, pokud student odpovědi odněkud čte nebo vyhledává. Na některých fakultách může být kontrola okolí studenta vedením fakulty nedoporučovaná (např. Právnická fakulta).
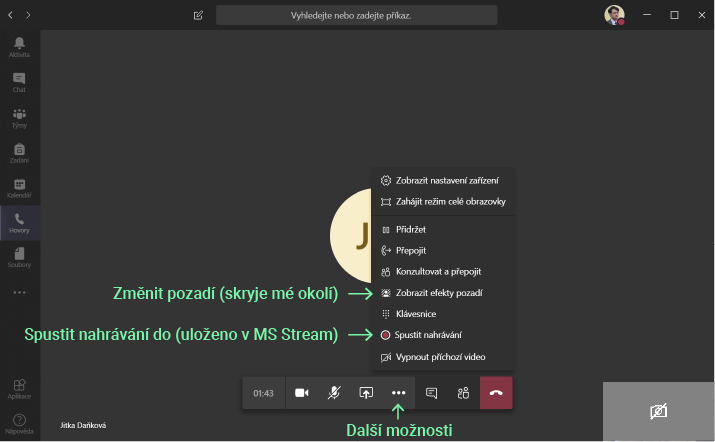
MS Teams umožňuje hovory nahrávat, ohledně nahrávání je vhodné se řídit pokyny na Vaší fakultě.
Pozor! Záznamy jsou ukládány do služby MS Stream a v případě, že zkoušku nahráváte, tak doporučujeme záznam z MS Streams stáhnout, archivovat (například v IS MU, příp. dle pokynů na fakultě) a následně záznam z MS Stream smazat. K tomuto záznamu mají přístup všichni účastníci hovoru, smazat jej může pouze ten, kdo nahrávání spustil.
Schůzku může začít nahrávat i student, v takovém případě se Vám v horní části obrazu objeví upozornění:
Mějte na paměti, že student může zkoušku nahrávat i jinými způsoby (např. OBS studio) a Vy tak nemusíte tuto skutečnost vůbec vědět.
V případě, že si student má vylosovat otázku, můžete pro tento účel využít generátor náhodných čísel, studentovi nasdílet obrazovku a otázku vylosovat. Můžete také nechat studenta vylosovat otázku u něj na počítači.
V ovládací liště klikněte na ikonku Sdílet a vyberte ve sloupci Plocha obrazovku, kterou chcete sdílet. Generátor spustíte tak, že do Googlu zadáte generátor náhodných čísel, generátor máte přímo mezi výsledky vyhledávání. Zadejte rozsah počtu otázek a vygenerujte náhodné číslo. Sdílení plochy lze ukončit ikonkou obrazovky s křížkem, která je dostupná v ovládací liště v obrazu webkamery studenta.
Student by nejpozději v tuto chvíli měl mít zapnutý mikrofon. Na vyžádání by měl student spustit sdílení plochy svého počítače (budete tak vidět, že nečte z připravených dokumentů). V případě tzv. Open book zkoušce uvidíte studentovu práci s e-zdroji. Nedoporučujeme ponechávat sdílenou plochu studenta příliš dlouho, neviděli byste potom dostatečně jeho verbální i neverbální projev.
Student nasdílí plochu tlačítkem Sdílet na ovládací liště a výběrem Obrazovky ve sloupci Plocha. (Vidíte pohled studenta.)
Nyní může proběhnout samotné zkoušení, případná diskuse a udělení hodnocení studentovi do Informačního systému MU.
Ukončení hovoru (zkoušky) proběhne kliknutím na červenou ikonku telefonu.
Postup učitele po zkoušce
Pokud jste zkoušku nahrávali, tak Vám přijde na e-mail oznámení o zveřejnění záznamu ve službě MS Stream (to může trvat desítky minut až hodin). K tomuto záznamu mají přístup všichni účastníci hovoru (tedy i student). Doporučujeme tyto záznamy stáhnout, archivovat dle pokynů na Vaší fakultě (např. v IS MU) a následně záznam ze služby smazat.
Students can take an online test using the Information system. The most common choice for teachers is to prepare a test with closed questions with one or more correct answers, which is automatically evaluated by the IS and calculated into the final grade. You activate the test for all students of the course at the same (pre-arranged) time and limit the time they have to complete the test.
Do you have no experience with creating tests in IS? Look at the video on what you can do in IS:
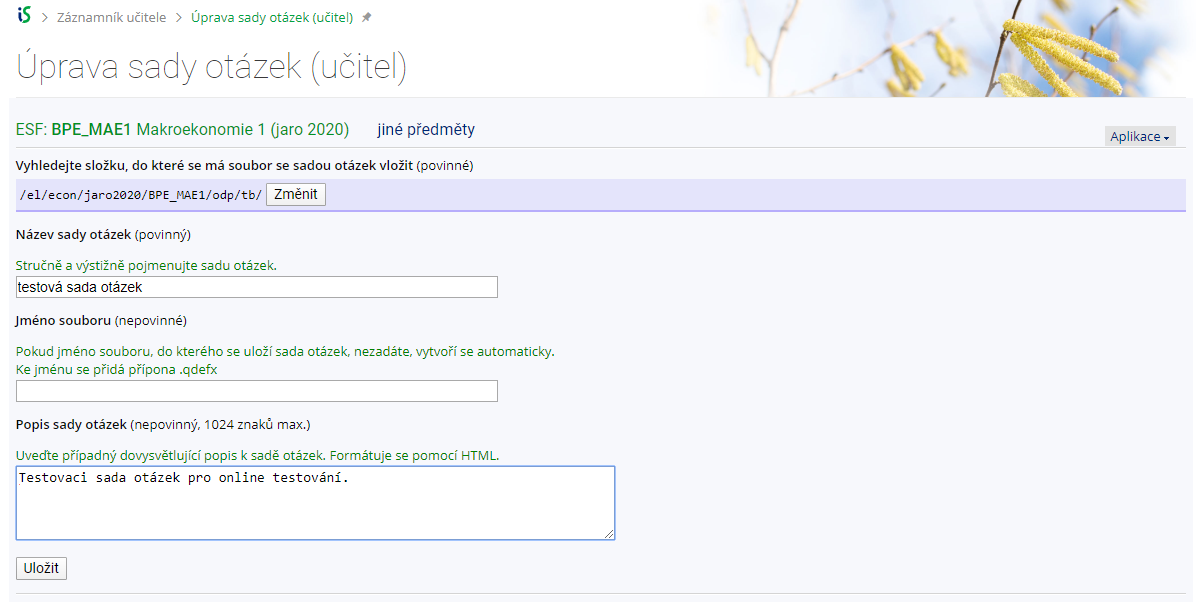
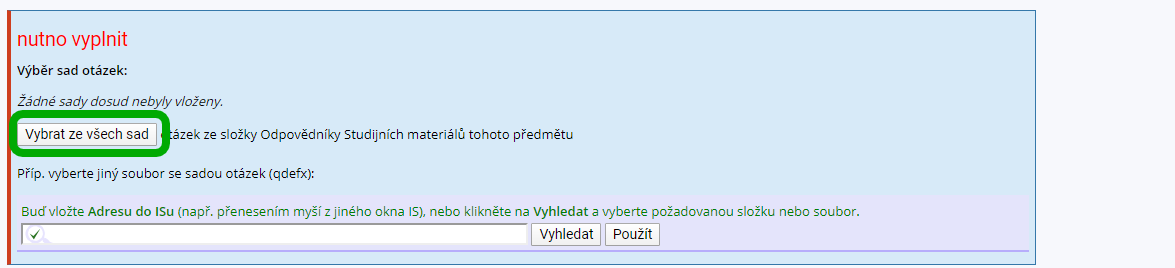
To prepare an online test in the IS (ROPOT) it is necessary to create at first a set of questions. A set of questions is a file with questions and their answers.
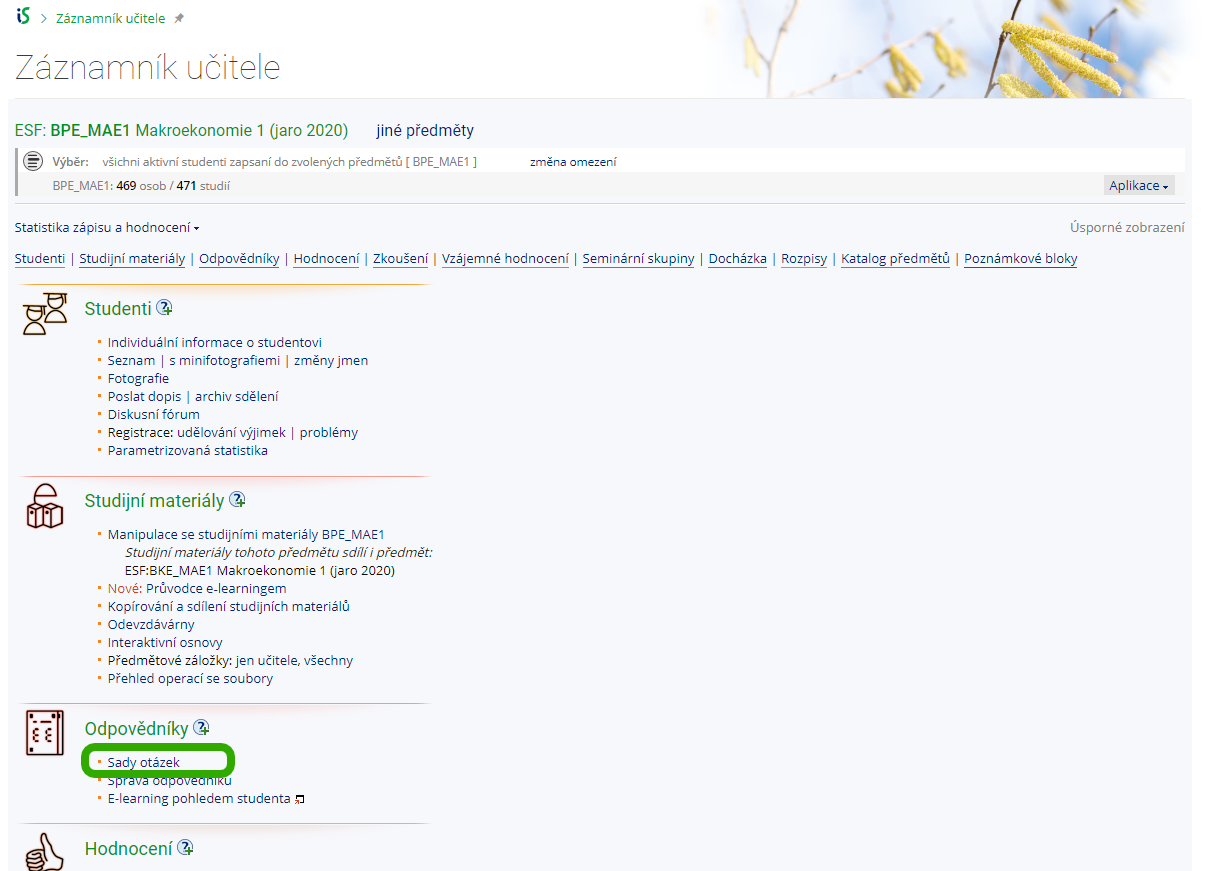
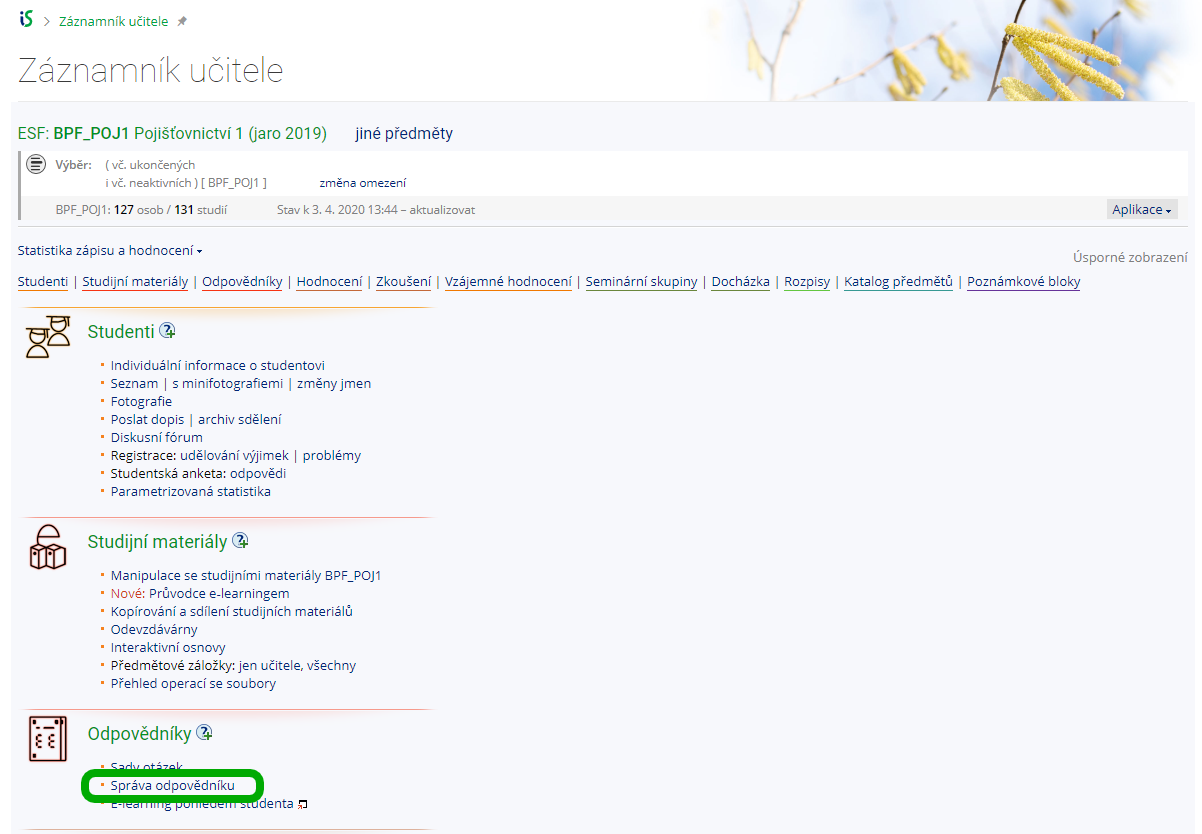
Přejděte do aplikace Záznamník učitele se zvoleným předmětem, ke kterému chcete vytvořit sadu otázek.
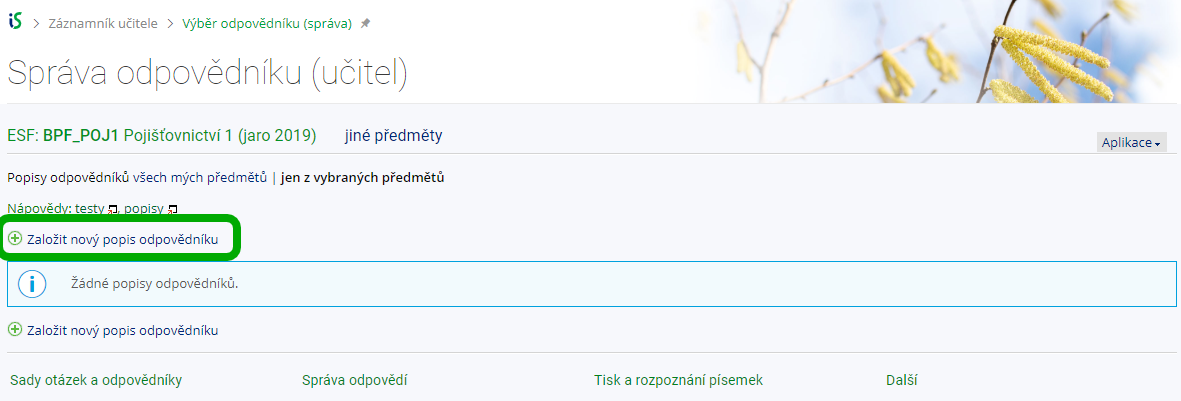
In the ROPOTS section, select the Qestion sets menu. You will work in this menu whenever you perform operations / edits with question sets.
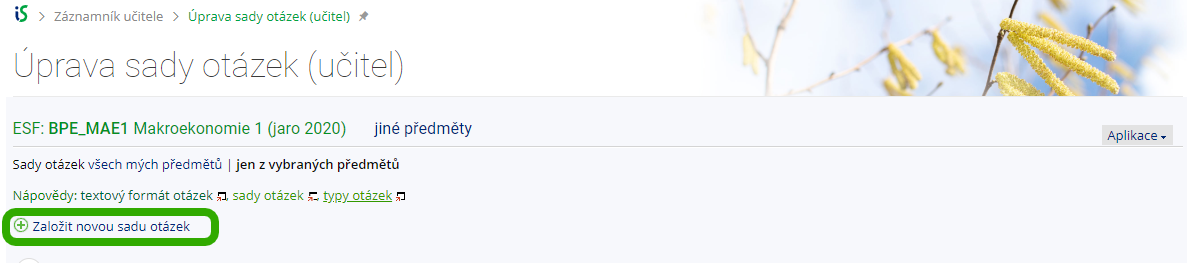
To create a new question set, choose Create New Question Set.
Choose a question set name. Optionally, you can also choose a file name and set description for better orientation.
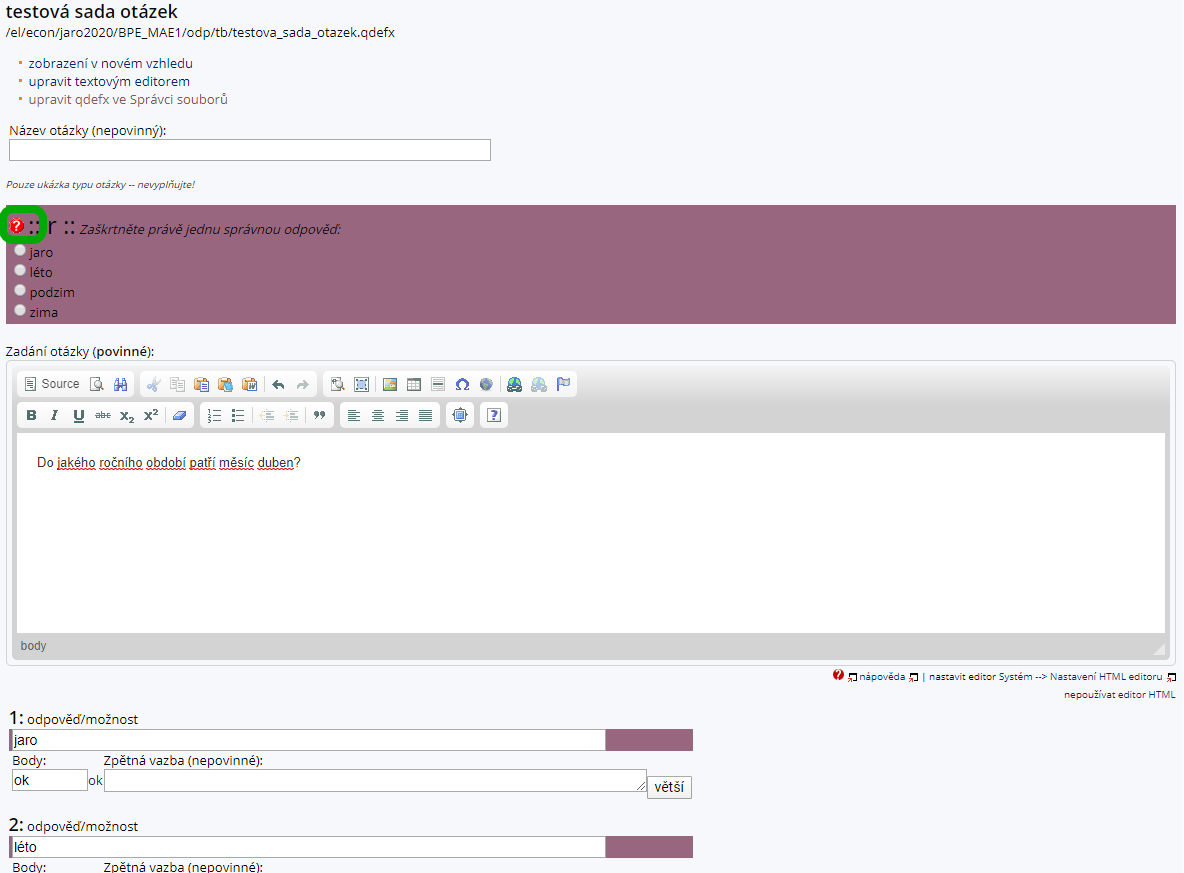
You can insert a new question into the form by selecting one of the question types in the Insert new question menu. The types of questions are described in more detail in the help.
For help on how to fill in the form, click on the red question mark icon. Save the form and repeat the process.
If you plan to convert a large number of questions with type:r, :c or :a, you might consider using a question converter. If you would like to create a special question, you can also try the i advanced question editor.
Once you have the questions for online testing ready in the IS, you need to set the test itself. Every teacher has different preferences therefore there are many different kind of setting. We've tried to pick one setting for you, that might be the most useful for online testing.
Preparation and setting of the ROPOT for online testing
Navigate to the Teacher application with selected course you wish to execute the testing.
In the ROPOT section choose Work with ROPOT.
Choose Create a new ROPOT description. You will create a new "test" with this option.
In next step you can choose from different setting of the test. In current situation the best setting is other, which will allow individual setting of the test.
Name the ROPOT appropriately and insert detailed instructions if needed, it will be shown to students before the beginning of the test.
Now you need to choose which questions will be shown to the student during the test. Questions are chosen from the question sets (the instructions above). Choose Select from all questions sets.
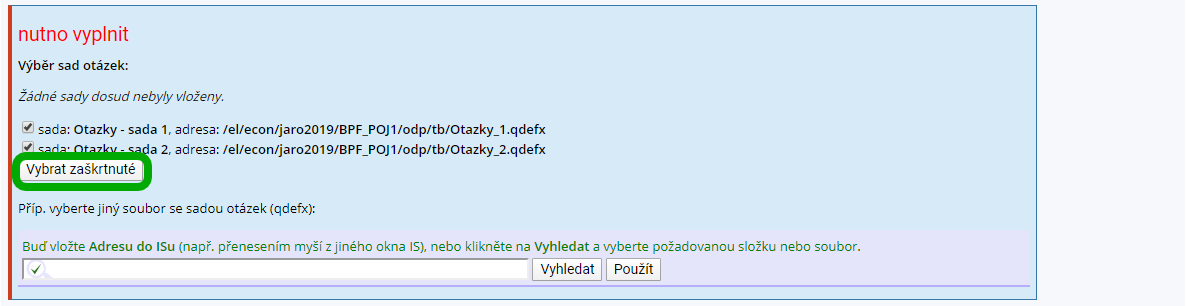
The questions sets selection will appear, choose those you wish to use in testing and confirm with the Choose selected.
Then you choose how many questions from each set will be used in the test (each student will have different test because the questions will be selected randomly from the set).
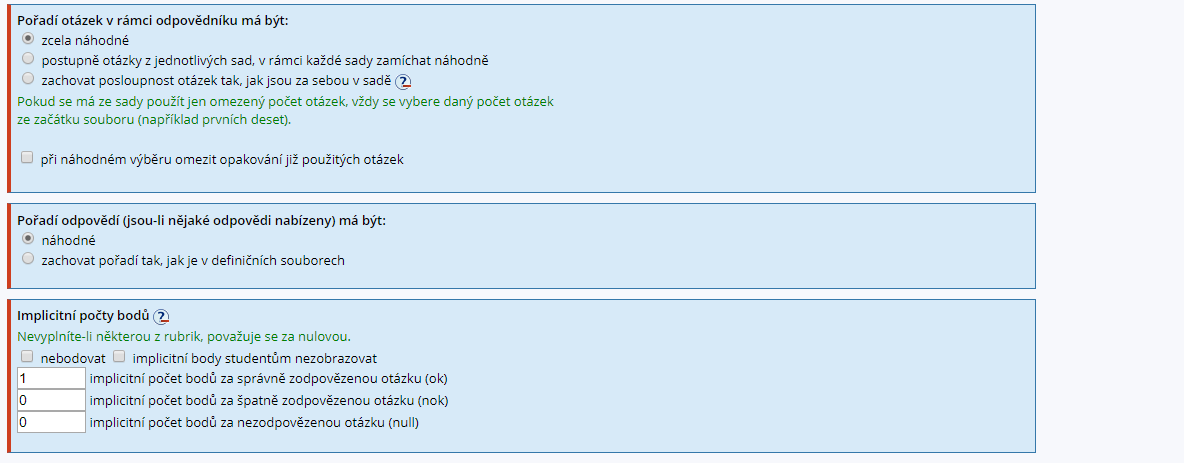
In the next step we will define how will questions and their variants be mixed up. We recommend random mixing unless the firm question order is required.
Next choose implicit number of points for basic setting of point values for correct, incorrect or unanswered question. This setting will be applied unless a given question is explicitely set for different evaluating (look at question settings).
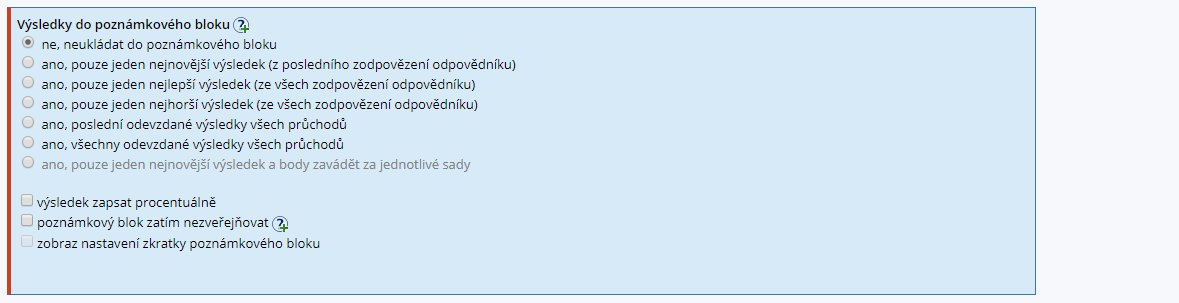
In the section Saving students' scores to a notebook choose if and how should the result from the test be exported into Notebook. If the Notebook is visible to student aswell, they will see their result immediately after submitting the test in the application Student.
In the next setting define the visibility of correct answers to student after submitting the test and option of repeated test taking. In normal testing mode it is usually set to never and no.
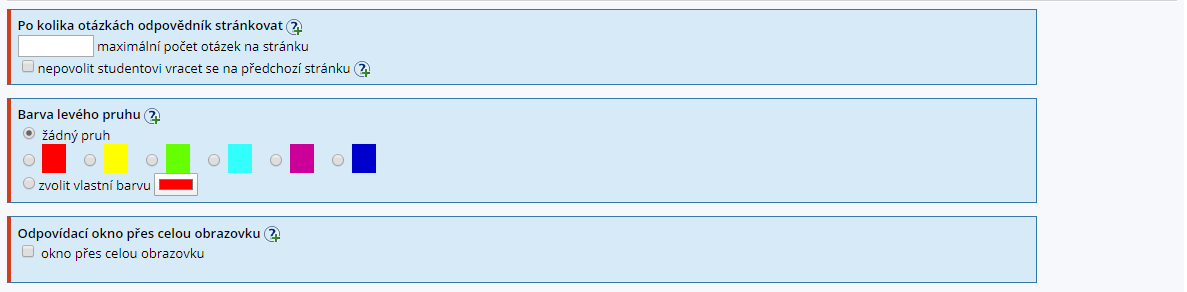
Number of questions per page can be used in situation if you use a big number of questions and you wish to make the test more readable.
Left column color option is used for a visual control of students in lecture rooms. During remote testing they have no use so choose "do not use any column".
Next setting is appropriate for questions where students write case sensitive words and interpunction.
Setting the total time for test is one of the most essential settings. It sets how much time students have for the test. In the case of student not being able to save the test before running out of time, the test will be saved automatically. Correctly set time limit can minimize the possibility of student to search for the answer in the literature or on the internet.
Function Track student's other activities enables to record student's actions in IS MU that are being done during the testing. This setting is not useful for remote testing.
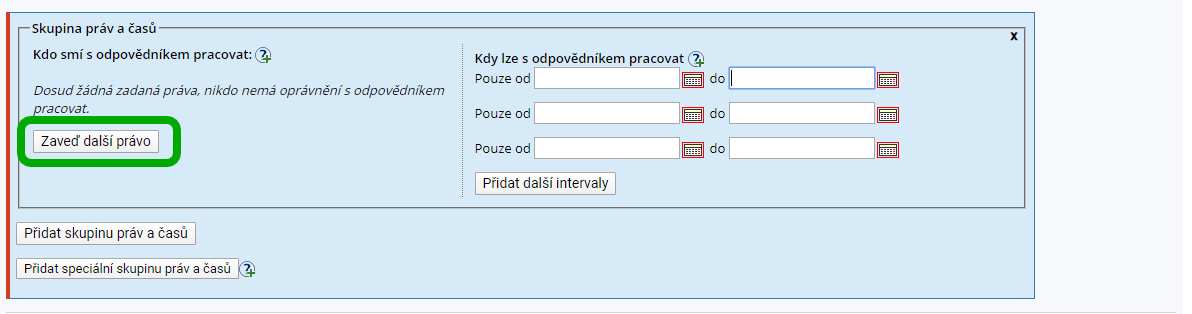
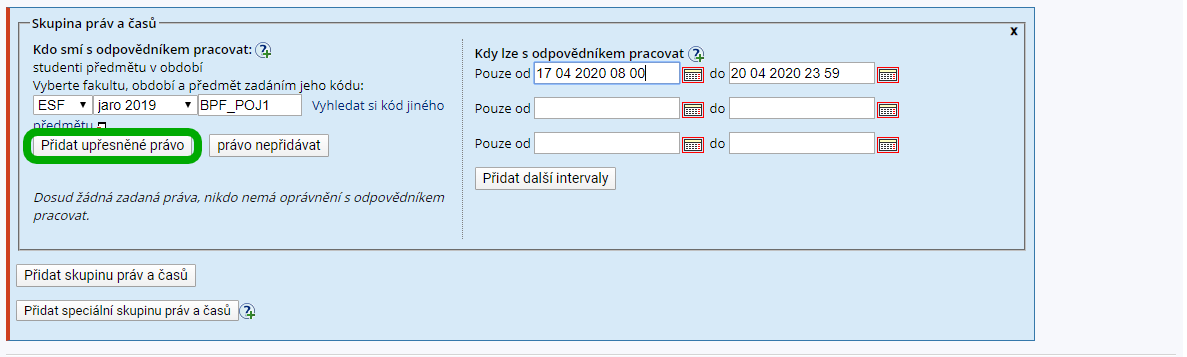
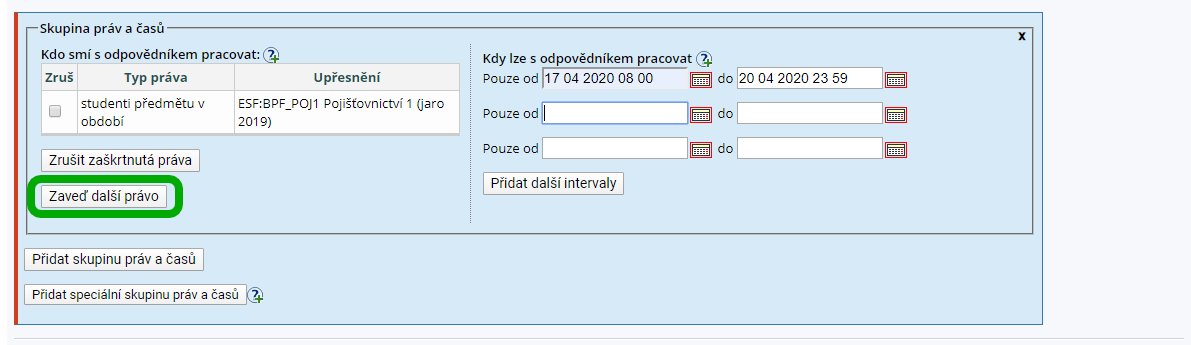
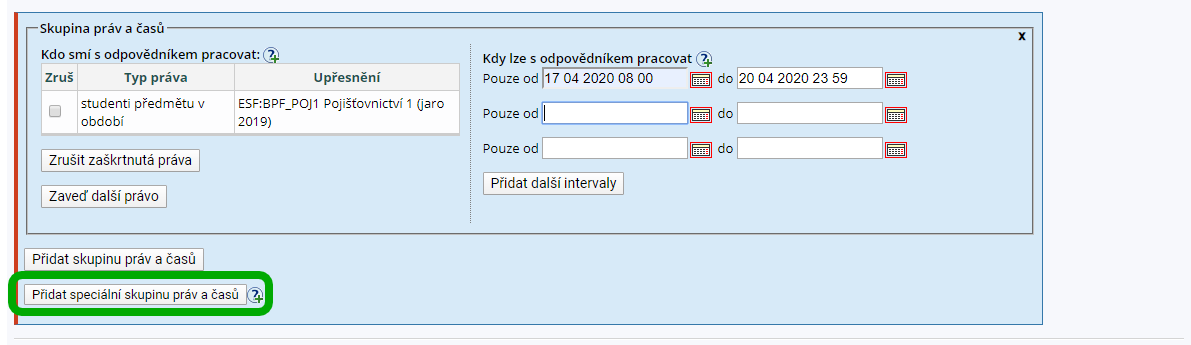
Skupiny práv a časů are used for detailed setting of accessibility to ROPOT. It definies who and when can use the test. Adding rights is done through button Add another right.
In normal course the ROPOT is set on students enrolled in course offered in concrete term (actual students of the course). Confirm the right choice with Add the right. It is possible to add individual person/group of people using Add the right. You can also set access to the ROPOT only for students who have registered in the IS MU on a certain exam date.
It is possible to add individual person/group of people using Add the right.
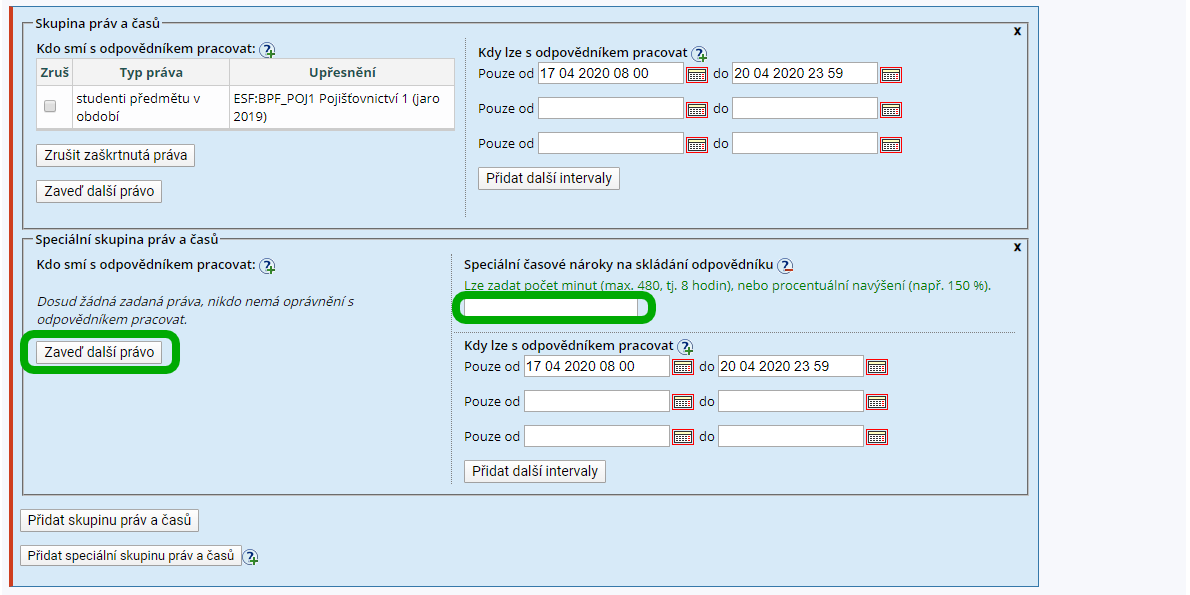
If you have students with special time requirements, you can also use the Přidat speciální skupinu práv a časů.
The procedure for entering rights is the same as in the previous case, with the exception that it is also necessary to fill in a field with a special time requirement for the student.
Once you have everything set up, the last step remains. This is saving, and thus at the same time confirming, the ROPOT settings.
The first option is to Save and make accessible. The ROPOT will be saved and will be made available according to the specified rights and times.
Second option is to Save and make inaccessible to students for now. The ROPOT and all its settings are saved and you can work with it later and edit it. Students will not have access to it.
The whole act is completed by confirmation.
Teacher can find itsTeacher notebook → Work with ROPOT, or in the study materials of the course Teacher notebook → Work with study materials → ROPOT.
Students see actual ROPOTs in applicationStudent.
You can add addresses on ROPOTs into Interactive syllabi of the course
Use the usual communication channel with students (group e-mail, interactive syllabi, discussion groups) and let them know in advance that the exam is ready, when it starts and where they will find with link to start an online test.
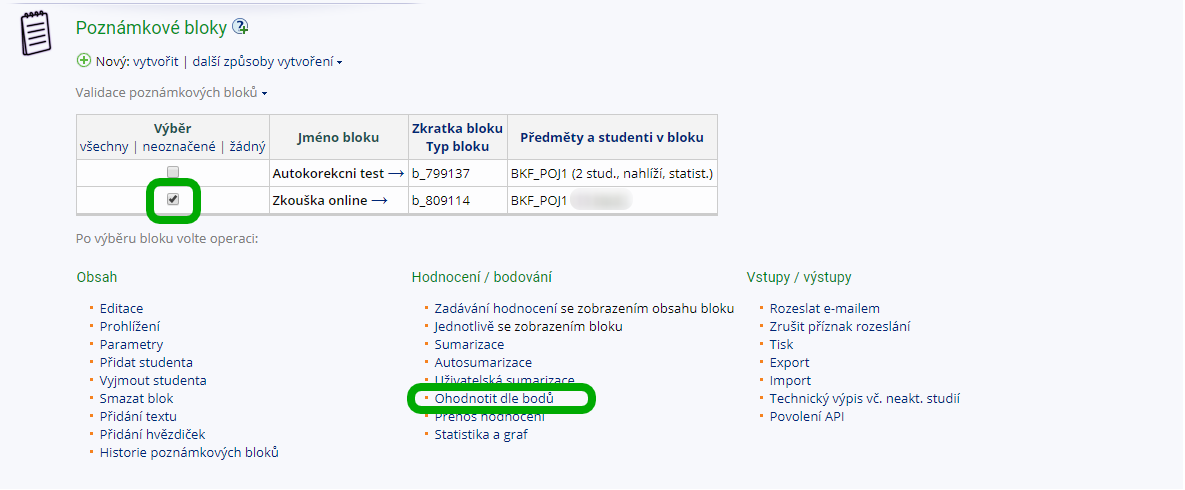
Každý bodovaný online test/odpovědník můžete snadno ohodnotit dle bodů v poznámkovém bloku.
Výsledky online testu jsou propsány do poznámkového bloku předmětu.
V sekci Výsledky do poznámkových blokůsi vyberete, zda a jak se má výsledek z testového odpovědníku exportovat i do Poznámkových bloků. >Nastavení zkoušky > bod 8
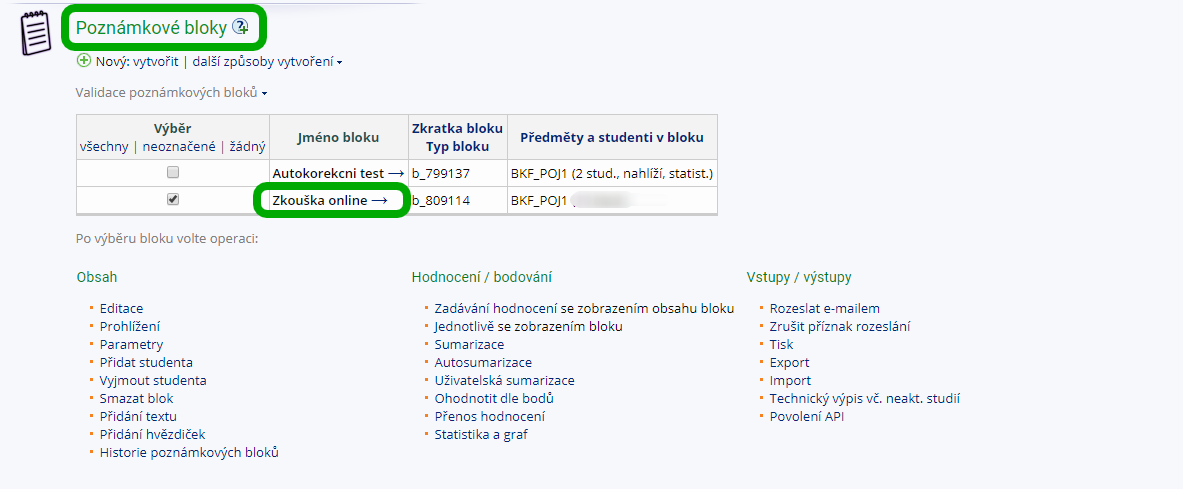
Poznámkové bloky najdete v Záznamníku učitele daného předmětu.
Poznámkový blok má stejné pojmenování jako test.
Poznámkové bloky nabízejí velkou řadu funkcí pro operace se záznamy v nich. V našem případě chceme převést body z testu na známky.
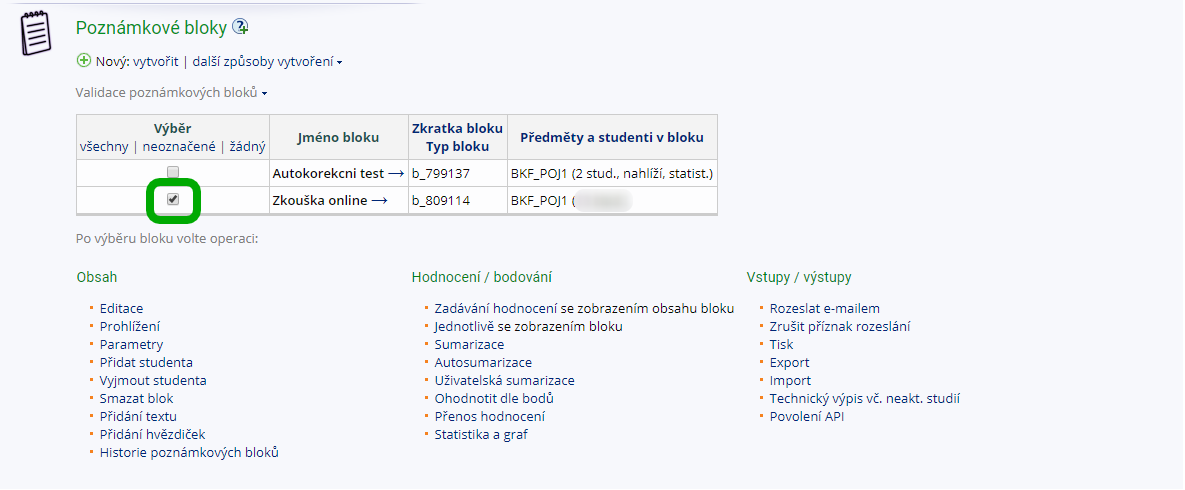
Nejprve označíte poznámkový blok, kde jsou výsledky testu.
Z menu poznámkových bloků vyberete položku Ohodnotit dle bodů.
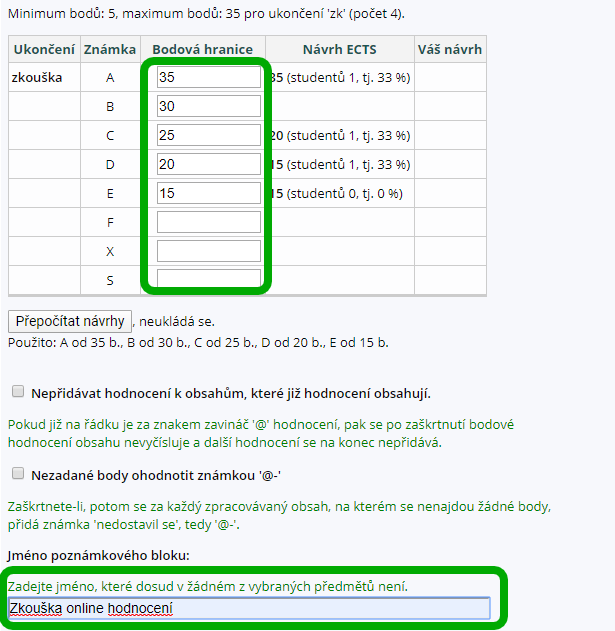
V tabulce zadáte požadované bodové hranice pro jednotlivé známky a zvolíte jméno nového bloku, kde se operace uskuteční. Víte-li, že ne všichni test splnili a přejete si za nesplnění udělit hodnocení “-” můžete zatrhnout položku Nezadané body ohodnotit známkou ‘@-’ . Následně zvolíte uložit na konci stránky.
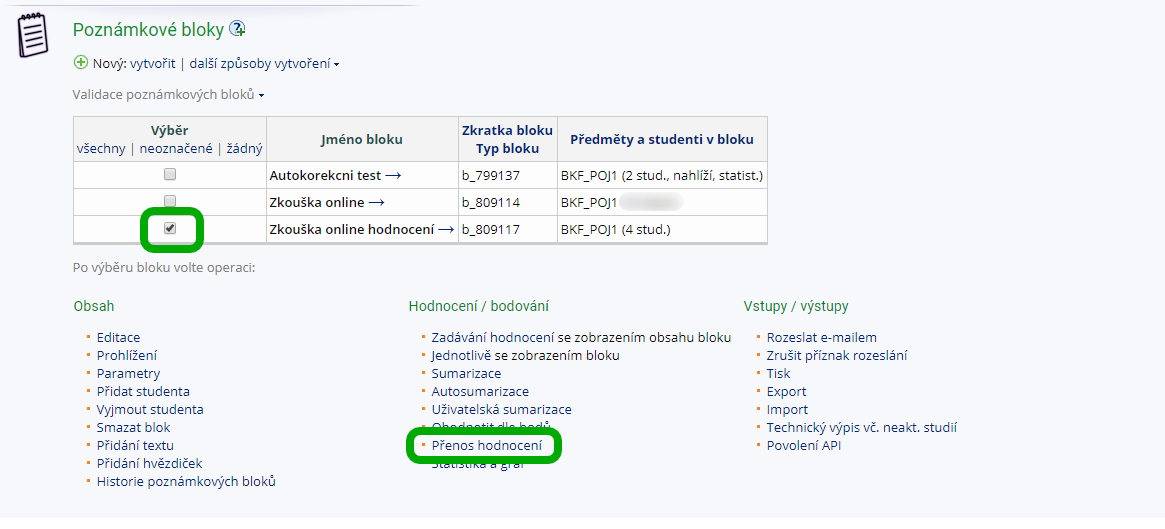
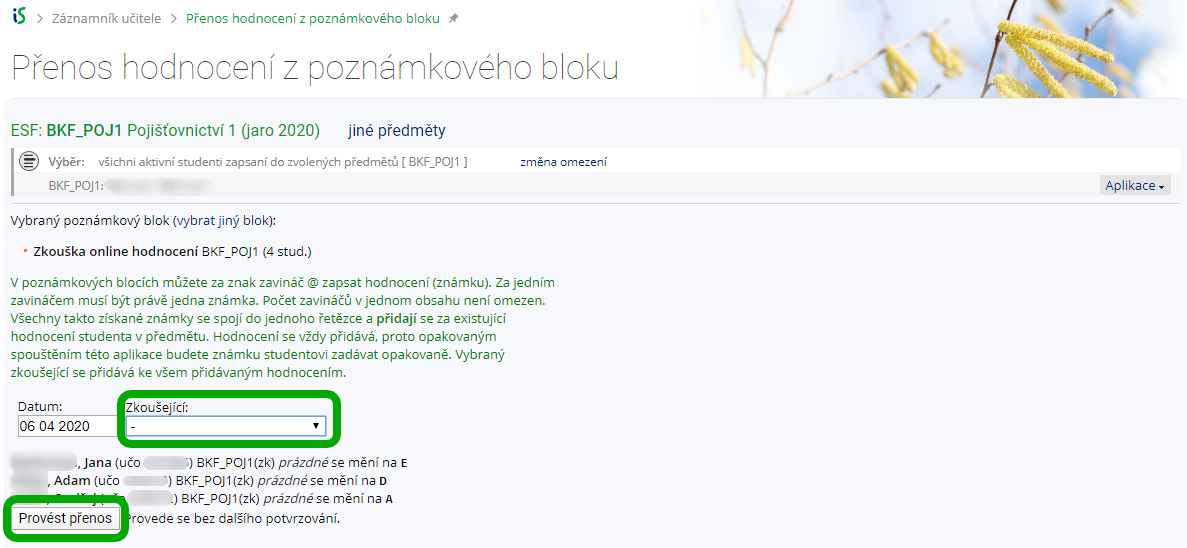
Následně ve výběru bloků označíte blok s hodnocením a z menu zvolíte přenos hodnocení.
Z menu vyberete jméno vyučujícího a potvrdíte tlačítkem provést přenos.
Hodnocení se v tomto okamžiku provedlo a studenti mají zapsané své známky. Zcela obdobně můžete provést i hodnocení zápočtů.
Chcete-li se o poznámkových blocích, a možných operací s nimi, dozvědět více, navštivte naši nápovědu.
Were you in this situation? The students came to the classroom at the given time. They hid their cell phones, sat down with paper and pencil, and for one hour they all wrote, drew, counted, and finally handed in their paper. The submitted papers were divided among the leaders of seminar groups, teachers or doctoral students, who corrected them for long hours and then gave the students grades. What about that now?
How you can remotely replace these classic written exams
If the test contained parts where it was necessary to count on paper, draw graphs, diagrams and drawings, then it would be very difficult to convert into online testing. However, it is still possible to organize such an exam, only in a remote form. You would start the exam with the help of video conferencing software and you then show students the assignments they have to solve on paper. Students write the exam at home, but in the so-called open book mode, but with access to materials, textbooks and the Internet (this cannot be effectively prevented). It is necessary to change the assignment accordingly. To make it difficult for students to copy, for example, it is possible to generate a different assignment for everyone.
At the end of the exam, students take photos with a mobile phone (or camera) or scan them and put them into the IS in a prepared vaults.
The teachers then go through the papers and give the students a comment in the notebook and the number of points.
Cheating (and the collective solution of examples) can be reduced by notifying in advance that you will call a random number of students by videoconference after the test and have them explained how they came up with the solution.
Tips
Ask the e-technician for help to set up the vaults and videoconference correctly, when you enter the assignments, or the generation of these assignments and distribution among students.
It is necessary to reformulate the assignment of exam on the so-called open book exam, ie for a situation where you do not mind that students can find formulas, etc. in the textbook or elsewhere.
Find out in advance which students do not have a phone with camera or scanner. Contact them in advance and arrange an oral exam with them separately.
Expect students to share their exam solutions on social networks and student's servers. It is advisable to change examples and assignments frequently.